Pages

Saturday, October 5, 2013

From the Farm Part 1: Apples and Pears!

     This is the beginning of what I've decided to call my "From the Farm" series. You see friends, the Kentucky Farm Fairy came to visit a week or two ago. You may ask, who or what is the Kentucky Farm Fairy?? Well, he looks an awful lot like my father in law.
     My father in law has a great farm in Kentucky, complete with two hilarious dogs, and a barn with a pottery room! (side note: the pottery room makes me wish Kentucky was a whole lot closer...) Recently, when he came to visit, there was an abundance of produce in tow. 
     My kitchen table was covered in such a variety of produce and it sent my creative juices in a tizzy! You'll see a lovely bowl in the picture that was handmade and now belongs to us! We're going to start off the series with the two dozen apples and dozen pears you see above. There was no way to eat them fast enough, so I ran through all of my options in my head. A lovely idea popped up and I ran with it. 
     Applesauce. I'd never tried it before, and I had this funny idea. I'm not crazy about really sweet applesauce, or adding lots of sugar into many things. After tasting a pear (and briefly going to heaven) I had the clever idea of using pears in my applesauce as a sweetener. So, let's great straight to work.

You Will Need:
*18-20 peeled, cored, and sliced apples
*4-5 pears
*1 1/2 teaspoons cinnamon
*1/2 teaspoon ginger
*1/2 cup water

(As an additional note, if I'd had Pumpkin Spices, I absolutely would have used those!!! However, for some reason it's difficult to find a shelf that HAS pumpkin spices in September...)

     Begin by getting your apples ready. I would highly suggest you invest in one of these phenomenal gadgets. Or, invest in a friend who happens to have one as well....thanks Sarah! 
     It's the quickest, easiest way to get your apples ready. It's super exciting to use, (Perhaps you're reading into this and realizing I'm easily amused...) and the apples come out looking like silly curls! 
     Back to the recipe...Once you have gotten all of the apples ready, dump them in the crock pot. Yup. That's right. My crock pot is at it again. Seriously, it rarely gets put away! 
     You'll see that I cut my pears up into the crock pot as well. From here it's a few simple steps and you're done. Add in your 1/2 cup of water and spices. 
     Now, turn your crock pot on high and walk away from it for about 3-4 hours. When you come back the apples will be SO SOFT. All it took was a few minutes with a potato masher. I happened to want my apple sauce a little smoother, so I whisked it a bit as well. 
     From here, all you have to do is put it in jars. Do it quickly- because if you don't, it will get eaten up before you can even put it away. Also, if you weren't sure, you can freeze some of your applesauce as well. That way you have the exciting choice of eating more after you think it's all gone! Seriously, I must have eaten a whole cup of it warm, it was so delicious!! 
     I think from here on out, I will only be eating home made applesauce. It was the best applesauce I've EVER tasted. In all seriousness though, if I'd known it was this easy to make applesauce in a crock pot I'd have been making it all the time. 
     AND, if for some reason you have an apple or two left over....try this! Take those same spirally apples, stick 'em in a pan, sprinkle some cinnamon on, and bake for about 20 minutes at 350. De-lish


Momma insisted you see this view as well. So there are her fingers!

     Well folks, this is the end of Part 1 of "From the Farm." You can look forward to: Hungarian Frying Peppers, JalapeƱos, and Beets! Stay happy and enjoy the fall, friends! 

                 <3 

Saturday, September 14, 2013

Promoting Responsibility with my own Immaturity!

     Well, the last few weeks of quiet can only mean one thing. School is back and in full swing! Now, I've been promising pictures of my classroom, and I have some! However, I'll be showing you my classroom a few little pieces at a time. Not because it's a work in progress or anything...

      My first glimpse into the classroom is a small but powerful area. In our district, Fifth grade and Sixth grade are in one building together. I happen to love this idea and think it works fantastically (not biased or anything). However, that means that the move from 4th to 5th is a BIG one. Students go from being in a very Elementary school setting to one that is a step closer to Middle school. They have lockers and they switch for classes. This transition requires a lot of work, but it is also crucial. Students, for the first time, have to truly be independent and responsible for their education. That happens to be something I love to instill in my students. Their education can't be taken away from them and it is something to cherish and work hard on.

     For this reason, I try to create a classroom that fosters that independence. Each area is a tool that they can use to become responsible. The first area I am showing you is at the very front of my room. (On each side of the door!) It is where work is received and turned in. First, let me introduce you to the Absent Bin. In the past, if students missed school they would frequently just be handed what they missed. Now, don't get me wrong, I'm not just making my students fend for themselves! However, I believe that a great step for students to take is to come back from an absence and take the initiative. Instead of waiting for someone to come to them, they can take the first step. It shows that they understand that what they missed is important.
     Now, just because it fosters independence doesn't mean it can't look hilariously entertaining! My entire room this year has a Despicable Me Minion theme. I can't get enough of those little dudes. They crack me up! What you are looking at is a box that can hold hanging folders. 

     Inside, are 4 folders with a few extras behind. Each folder is designated for a specific subject. The last folder is called "Friday Folder." This is because, each Friday students have a special folder to take home graded work and flyers to their parents. This folder then gets signed and returned so that I know their parents saw all of the most important papers. If a student loses one of those papers, they can get extras in that folder. The subject folders get filled with extras of each paper I hand out in that class period for the week. 
     The beauty in this is that students don't even have to ask for papers they missed. They are able to walk up to this box and find the information they will need for each class missed. Obviously I am always around if they need to ask questions! 

     On the other side of the door way is where work gets turned in. At the beginning of the year, students get several reminders to turn in their work each period. As we go through the year they get fewer reminders. This enables them to begin to make it a habit to enter the room and turn in work immediately. Of course- they are entertaining as well! 
 
     Seriously can't get enough of the Minions. ANYWAY, here are two very important parts of my classroom. You also get the sneak peek of all of the Minion signs/decorations that I've made for the room. Enjoy, give me your feedback, steal the idea for yourself or do all of the above. I'm just glad I finally had a few moments to show you what I'm proud of in my room! 


                 <3

Monday, September 2, 2013

For When You'd Rather Eat Wings

Hey Friends,
        We're at T minus 15 hours to the first day of school! I am working on making sure that everything is ready (or as close as it's gonna be!).

         This recipe has been ready to shoot out to you for a bit now, and I'm excited to share it with you. Every so often I get the craving for wings and that kick of hot sauce. Of course, I very rarely have wings in the house, and they're not always the healthiest option for my hot sauce desires. Lucky for me, I found this method of dressing up veggies with the taste of wings!

You Will Need:
*one head of cauliflower
*2 tsp. olive oil
*1 tsp. garlic powder
*1 tsp. paprika
*1 tsp. chili powder
*1/2 tsp. kosher salt
*2 tbsp. hot sauce (or as much as you want!!)

     Let's get kickin'! Preheat your oven to 425, and get to washing that cauliflower. Once it is washed, break it up into little florets in a medium sized bowl. In a separate, smaller, bowl combine all of your spices. Apologies ahead of time; my mind went to La La Land and didn't get pictures of these first two steps.
   
     Believe it or not, you don't have many steps left. Drizzle your olive oil over the cauliflower florets and toss them a bit to make sure they are coated evenly. Next you're going to coat these florets with your spice mixture. It should look like this:
Voila!
          Pull out a cookie sheet that will be able to hold all of your kickin' florets! I like to cover my cookie sheets in tin foil so that the clean up is THAT MUCH EASIER! :) Spread your florets out on the sheet so that they are all in one even layer. 
    Pop these babies in the oven for about 25-30 minutes. They'll start to have some crispy, burnt edges to them when they're ready. When they come out of the oven, I like to dump them back into that original large bowl. That way, when you coat them with hot sauce, you pick up some of the extra spices that were left behind. You can't stop me from making sure there's LOTS of flavor.

    Pour in your hot sauce and mix to coat. Let's face it, I don't usually stick to my 2 tablespoons. I drown these suckers! It's all about how much spice YOU want.
     Ta Da!!! You're done! These things are so tasty and are a big hit for me and the mister. I think it might be the only way he's eaten cauliflower!
     Let's be honest, are these a complete trade for wings? Heck no. BUT, when you're looking for that spicy hot fix- they're great. Give it a try and let me know how you like 'em!

     To all you fellow teachers out there, get it started with a bang! I'm looking forward to meeting my new group of kiddos, and showing you my fabulous classroom. Much love to you all.

               <3 

Tuesday, August 20, 2013

The Most Dangerous Cake

     The Most Dangerous Cake.

     Prepare yourselves, because I'm about to expose my literary nerd status.  If you have never read the short story "The Most Dangerous Game," it's worth a read. The genius of this story is the situational irony that occurs at the resolution. The hunter becoming the hunted takes a surprising twist when you read the final scene.
     What does this have to do with cake? Great question. Believe me, when you take your first bite of this cake, you'll realize the tides have turned. You no longer have control. The cake is hunting YOU.


      A bit dramatic? Yes. Is this cake divine and irresistible? Yes again. Here we go!

You Will Need:
*One Box Devil's Food Cake
*1/2 of a 14 oz. can of sweetened condensed milk
*1/2 of a 12 oz. jar of Caramel ice cream topping
*One container whipped topping
*One bag Heath bar crunch topping (I found this in the baking aisle of my local grocery store)

     This, as always, is a Pinterest find that I've made my own few tweaks on. Begin by baking your Devil's Food cake according to the directions on the box. I made one alteration to the "typical" cake directions. When my cake batter was mixed, I added in about 5/6 tablespoons of Hershey's Dark Chocolate Syrup. I love giving a cake that extra oomph of chocolate, moistness, and depth.
     When your cake is out of the oven, set it aside to cool for only 5 minutes.
     You will then use those five minutes to prepare your Caramel drizzle. In a small saucepan on the stove, combine half of your can of condensed milk with half of a jar of caramel syrup.
     On low heat, stir frequently until the two are combined and slightly warmed. They will be a beautiful light caramel color that is warm and smooth.
    When this has been completed, move back to your cake and cut slits into the entire top of the cake. Be careful to not cut all the way through to the bottom.


Your next step is to pour your caramel sauce over the cake and let it soak in. (YUM!) 
        Follow this by sprinkling about 2/3 of your bag of Heath crumbles onto the cake and caramel sauce. You are then going to put the cake to the side and let it cool entirely. 
      The great thing about doing all of these steps while the cake is still warm, is the result! You get a great moist cake, with a slightly gooey, crunchy middle layer of caramel, chocolate and toffee. When your cake has cooled completely, "ice" it with your container of whipped topping. You'll want the whipped topping to be at least refrigerator temperature or room temperature. This will make it easier to spread. 
   Finally, sprinkle the remaining Heath Bar crumbles on top of your whipped topping layer. Cover and put in the refrigerator until you are ready to serve it! I brought this to a family barbecue last weekend, and believe me when I say- it was a hit. In fact, I was nervous to bring the left overs home with me for fear that I would gobble it all up way too quickly! 
   This was a fantastic Pinterest find, that worked very well for me. Again, though, be warned. It is DANGEROUS! You will not want to leave any left in the pan! 
    Well, ladies and gents, I am writing to you in my last few days of freedom before I head back to the school building. There is one more recipe locked and loaded to be sent out to you soon, and then you'll get classroom shots! Keep cool in these next hot days of summer. 
             
                     <3 

Saturday, August 17, 2013
Craft: Welcome to Our Home

     As promised, today brings a craft post! FINALLY.

     When someone goes to their happy place they may picture their feet in the sand, with the crashing of waves on the beach. Or perhaps you go to a forest with sunlight streaming through the leaves and the sounds of birds chirping around you.
     I go to Michael's. That's right. Don't judge. The smell of craft supplies and endless varieties of options makes me excited and relaxed all at once. For a few brief shining moments, Michael's had a Membership Rewards program. In the few months that it existed, I made it to Gold member status.

I SAID DON'T JUDGE. haha.

Let's face it. I LOVE crafts and would empty my bank account on crafts if I could.

     With that being said, I have been eager to create things for decor in our new house. I lucked out on a recent trip to Michael's and knew just what I wanted to do. As I browsed Michael's to refresh some calligraphy materials for a wedding order, I happened upon these simple dudes.
     For $0.99 I got myself two wooden frames that fit a 5x7 image. Our front door has had an empty hook for the last 4 months and this was going to fix that! While these are adorable, they are also slightly blah.
     My first step was to change their coloring. I knew I wanted to keep the integrity of the wood, and I also had no official stain. I had read various posts on using tea to stain things. So I got myself a mug of very concentrated tea.
     To apply the tea, I used one of those $1 foam wedge "brushes." WARNING. After about 4-5 coats of tea you could barely tell the difference and my patience was slowly slipping away from me. Understatement, my patience was gone. I thought through my options and refused the option of going to buy stain or paint. I could solve this. And solve it I did.
     What got me this beautiful walnut coloring you ask?!? Instant Espresso. No joke. It was one shelf below the tea and I knew it would be much stronger. :) So I forged ahead with my sponge brush and a cup of espresso. Ok, two cups of espresso. One to drink, one to craft with.
      In my many hours of Pinterest browsing, I came upon this cute little graphic. I originally was not sure what I wanted to do with it, but as soon as I found the frames, it was set.
     I printed this out on regular printer paper with my home printer. In order to cut it to the correct size, I laid the image underneath of the frame exactly how I wanted it. From here, I used a pencil to mark the lines of the little semi-circles that lined the OUTSIDE of the inner frame. (If that's confusing, refer back to the first picture...) I basically wanted to make sure I would have enough paper to glue it to the back of the frame. Cutting it down was as simple as pulling out my paper cutter and lining up the marks.
     The final step was to apply some Mod Podge to the back of the frame and line up my picture correctly. After this dried, I added an extra coat of Mod Podge to the paper that was touching the frame as an additional safety measure. The awesome thing about this craft is, it only cost me 99 CENTS! And I still have another frame to be crafty with. I was even very resourceful and used the twine that held the two frames together originally to hang this new art on the front door.
     Here is the final product! I am very pleased with how it turned out. Especially the color (and scent!) of the wood. My brain is already buzzing with ideas for the second frame- so keep your eyes peeled for another craft!
     Have a wonderful sunny Saturday and be well friends. I am enjoying these last few days of summer before school starts up. Then you will get some posts about my organized classroom! Can't wait to show you the theme for this year!
     
                 <3

Friday, August 16, 2013

Chips: You Can Eat Every Single One

     Nope. No typo. You can make all of these chips and then eat every single one. 

   As I've been thinking about this post, one thing has been in my mind. This post may be dancing on that line between "Yes, I'm healthy," and "I'm HEALTHY." I could be wrong, but sometimes I think KALE is on that dividing line. You may love this post, or look at it and think, "I'm out." That's really ok with me. 
     I WILL say this. I was what you might call "behind" that line originally. Until I tried these. Now I'm a huge fan. I challenge you to try them at least once. Then make your decision. Honestly, I was never really a huge fan of kale. It's a tough and very strong tasting green. As a child, I only saw it when I fed it to a pet rabbit. (rabbit obsession alert) Lately, I have been experiencing it in a variety of dishes and actually liking it. 
     The great thing about Kale Chips is the transformation they undertake in the oven. No lie. Sometimes it baffles me how something so tough and chewy can become fragile and crumbling. Nevertheless, here we go. The recipe is simple, but will take some monitoring if you buy a large amount of kale. 

Ingredients: 
*Kale (try your local Produce Junction!)
*Pam Olive Oil Spray
*Seasonings

*You will also need cookie sheets, parchment paper, and to preheat your oven to 350. 

     You are going to begin by rinsing all of your kale and placing it on a paper towel or dish towel to dry. It is important that you give it time to really dry- or press it between towels to get the excess water off. 

   The next step is to trim the kale. Believe it or not, the easiest way to do this is with your kitchen scissors. What you want to do is cut the leafiness away from the thickest part of the stem. No one really eats or likes to taste this very fibrous part of the leaf. You can basically just cut the whole leaf in half making one cut down each side of the stem. 
     From here, you can cut (or rip) the leaves into smaller bite size pieces. Let's be honest, I rip the kale. This is not an exact science. Just rip the dang leaves. While the pieces are sitting on a towel, you'll want to cover a cookie sheet with parchment paper. 
     Arrange your kale pieces on the parchment paper with a bit of space between each one. If the pieces are overlapped you may run across some pieces not being completely baked. 
     Next, spray each piece lightly with your spray Olive oil. This brand works really well for me. Now, I've seen different theories on this next part. Some recipes will tell you to season the chips after they are baked. I like to put my seasonings on before. I am of this opinion: why not bake your seasonings into the chip for more enhanced flavor? 
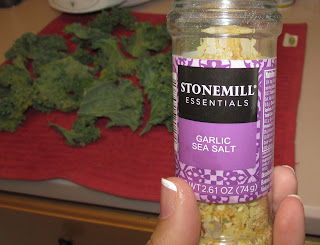
    So far, each time, I have used my "go-to" spice. A great garlic sea salt grinder I found at a discount store. In the future, I may branch out and go more bold with spices. (e.g. why not go with chili powder?!) 
     After seasoning your kale pieces, put them in the oven (at 350) for 10 minutes. If, at the ten minute mark, you notice they are not all looking crispy- keep going. With this important warning: Add on time in ONE TO TWO MINUTE INCREMENTS. It is very easy to burn these chips. Not that I'm speaking from experience or anything...Ok. Fine. I am. So there. And burnt kale chips- not tasty. 
    You'll see in this picture that the chips still have a good green coloring to them. If yours are brown...uh oh. Notice how much smaller they are! These leaves will now be delicate and crunchy. It will probably take you several rounds of this to finish all of your kale. (Depending on how much you buy!) 
     They definitely took on the salty, garlicy taste. Again, I'll say it, it's amazing how these just disintegrate in your mouth! When I'm craving something like crunchy, salty chips these are great. I can eat a ton and not feel bad later. 
     Give them a try and let me know how they turn out! OR pass on the healthy, healthy kale and come back here tomorrow. Why you ask? Because tomorrow I'm posting a CRAFT! Finally! I've been trying to get some more crafts for you to try out and it's finally here! See you here tomorrow! 

                  <3 

Tuesday, August 13, 2013

The Dying Tomato Fix: Sweet Balsamic Stewed Tomatoes

Hi All,
      I apologize for the temporary silence here on the blog! However- in the silence- we have reached 700 VIEWS!!! Holy Moly guys! Thank you so much. I love that some of you are sharing and using what I have here.

     Now, if I haven't mentioned it before, my mother and I have a standing date. We have a great little Produce Junction near us. So every Monday we go and buy mounds of produce. There are several fantastic things about this. 1: You have someone to split the huge quantities with. 2: MONEY SAVINGS. Quite honestly, reason number 2 should have sold you on its own.

     A bit ago, we split a bag of about 15 tomatoes. Here is where my mistake played into the equation. I put them in a beautiful bowl and promptly forgot about them for just a little too long. Well hello Problem, I have a Solution for you. In past meals, Hubby has finished off entire cans of stewed tomatoes. That got my lil head thinking. How hard can it really be? The answer- not too difficult! I've even got a fun trick for you to make it even easier.


What You'll Need:
*8 Tomatoes
*Half of a Red Onion diced
*2 cloves of Garlic minced
*1 tsp. Thyme
*1 tsp. Oregano
*1 tsp. Basil
*1 tsp. Garlic Powder
*1 tsp. Onion Powder
*2-3 tablespoons Balsamic Vinegar (you can skip this if you don't have it on hand)
*1-2 tablespoons Olive Oil

   If you can picture the stewed tomatoes you've had in the past, you'll (hopefully) remember that they do not have skin. I'm sure this can seem to be quite the dilemma. However- it really truly is not. Let me introduce you to a simple method thanks to my Momma (of course)!

   Place all of your tomatoes in a pot that has enough water to keep the tomatoes floating. Bring this pot to a boil. What you will notice as it boils, is that the skin of the tomatoes will split. As each tomato splits you can pull it out of the boiling water and drop it into a bowl of very cold water to the side. Continue this until all of your tomatoes have split their skin and are in the cold water bath.

      Here is the awesome part about this trick! When you pick up a tomato and start to pull the skin: the whole skin peels off easy-peasy-lemon-squeezy. Thank you to my Momma for the memory of watching that trick as a child.
     Once you have completed peeling each tomato, you are going to want to chop the tomatoes into slices and then quarter each slice. (Or however you'd like to.) Another note at this point, some other recipes will instruct you to take out the "core" of the tomato. If that is your preference, go for it. From my point of view after trying both ways, I couldn't tell the difference.

     At this point, you're going to want to get a pot on the stove with your Olive Oil, diced red onion, and minced (or pressed) garlic browning. The goal is to get your onions to a point of translucence.

    As you can see in this picture, I put my onions in first for a bit. Adding the garlic later kept it from burning. Once this is done, you can add in your chopped tomatoes and their juice. From here on out, this is ridiculously easy. Add in the rest of your spices. (Garlic powder, onion powder, thyme, oregano, basil)
      Lastly, add in the Balsamic Vinegar. I sometimes will also add about 1/2 a cup of water if the tomatoes were not very juicy.
     You're going to now put a lid on this pot and let it cook for about 15 minutes on medium-low heat. After the 15 minutes with the lid on, take it off. Cook the tomatoes for another 15 minutes with the lid off to cook off some of the liquid. (Not all of it!!) Voila! You're done!

      These were a huge hit here for dinner and disappeared quickly. My recipe is a bit of some research as well as some experimentation. So we're calling them Sweet Balsamic Stewed Tomatoes. I love the sweetness that the Red Onion and the Balsamic create. They would be great on chicken, or even tossed in pasta! However you're craving it at the minute.

     That's it for today. I'm currently typing and cooking my next blog post! So keep your eyes peeled. And a big THANK YOU again for 700 views! You all are awesome.

      <3