Pages

Showing posts with label salt. Show all posts

Sunday, October 6, 2013

From the Farm Part 2: Jalapeños

Well, it's time for Part 2 of "From the Farm!" 

     Along with about 2 dozen apples and a dozen pears, we also became home to a little over a dozen jalapeños. While some of you wonderful readers may LOVE eating jalapeños all of the time, I couldn't quite imagine enough foods to eat jalapeños in before they went bad. 
     After a bit of research and formulation of ideas, I came up with a plan to at least preserve the jalapeños until it was time to make Fall/Winter chili. I will tell you about that first, but keep reading until the end, because there is also a quick and easy dip recipe at the end! 

You Will Need: (for preserving) 
* about 12 jalapeños
*1-2 teaspoons olive oil
*salt and pepper to taste

NOW- HERE IS YOUR WARNING!!!! When you work with jalapeños, I would highly advise wearing latex gloves (or any gloves for that matter). The minute you touch a lot of jalapeños with bare hands, your hands may react, but even worse will be when you accidentally touch your eyes or lick your fingers. WEAR GLOVES. 

     OK, now that that's over with, here we go. Begin by seeding your all of your jalapeños except for 1. Keep that one to the side until later. 

     Place the seeded and de-stemmed jalapeños in a pot of boiling water for about 10-15 minutes. It's crazy how even the steam from the boiling water caused some coughing effects! 
     The red peppers are jalapeños as well. That's what a mature and fully ripened jalapeño looks like! Now, from here I took all of the jalapeños and put them in my food processor. To that you'll want to add the olive oil, a tablespoon of the water the peppers were boiled in, and your salt and pepper for seasoning. 
     From here, I pulsed the food processor until I had a pretty decent puree. I didn't go too far, because the little flecks of red interspersed with the green looked lovely. 
     The puree was then transferred for my genius idea!! Wait for it..... ICE CUBE TRAY. Over the summer I read several magazines that had fun ideas of things to freeze in ice cube trays. Now, this comes with another warning. My suggestion would be to designate this tray for fun freezing adventures post jalapeños. Unless spicy water is something you're into... I am personally not EVER making regular ice cubs with this one again. 
    Voila! I have portioned amounts of jalapeño puree that can be pulled from the freezer and dropped into a crock pot of chili during the cold months! 

    Now comes the recipe you read to the end for! I cannot take credit for this recipe, but I can send a BIG thank you to my wonderful friend Becky for letting me watch while she made it! 

Ingredients: 
*2 blocks feta cheese
*3 seeded jalapeños (leave the seeds if you really like heat) 
*1-2 tablespoons olive oil

     The beauty in this dip is how easy it is. Plus who doesn't like spicy AND cheesy?!?! Dump all of the ingredients into a food processor and let it go until you have a creamy, pureed, slightly neon green dip. I swear I want to hug Becky an extra 3 times when she walks through the door with this dip. It works great with pita, or tortilla chips, or just your fingers. 
     Well, that's it for today's "From the Farm" edition. It's a wonderful Sunday night, there are Turkey burgers grilling, and I'm gearing up for another week with my classroom of goofballs. I hope you all had a wonderful weekend, as I did, and relaxed! As always, if you attempt one of my adventures please let me know how it goes! Or feel free to ask questions! 

               <3 


Monday, September 2, 2013

For When You'd Rather Eat Wings

Hey Friends,
        We're at T minus 15 hours to the first day of school! I am working on making sure that everything is ready (or as close as it's gonna be!).

         This recipe has been ready to shoot out to you for a bit now, and I'm excited to share it with you. Every so often I get the craving for wings and that kick of hot sauce. Of course, I very rarely have wings in the house, and they're not always the healthiest option for my hot sauce desires. Lucky for me, I found this method of dressing up veggies with the taste of wings!

You Will Need:
*one head of cauliflower
*2 tsp. olive oil
*1 tsp. garlic powder
*1 tsp. paprika
*1 tsp. chili powder
*1/2 tsp. kosher salt
*2 tbsp. hot sauce (or as much as you want!!)

     Let's get kickin'! Preheat your oven to 425, and get to washing that cauliflower. Once it is washed, break it up into little florets in a medium sized bowl. In a separate, smaller, bowl combine all of your spices. Apologies ahead of time; my mind went to La La Land and didn't get pictures of these first two steps.
   
     Believe it or not, you don't have many steps left. Drizzle your olive oil over the cauliflower florets and toss them a bit to make sure they are coated evenly. Next you're going to coat these florets with your spice mixture. It should look like this:
Voila!
          Pull out a cookie sheet that will be able to hold all of your kickin' florets! I like to cover my cookie sheets in tin foil so that the clean up is THAT MUCH EASIER! :) Spread your florets out on the sheet so that they are all in one even layer. 
    Pop these babies in the oven for about 25-30 minutes. They'll start to have some crispy, burnt edges to them when they're ready. When they come out of the oven, I like to dump them back into that original large bowl. That way, when you coat them with hot sauce, you pick up some of the extra spices that were left behind. You can't stop me from making sure there's LOTS of flavor.

    Pour in your hot sauce and mix to coat. Let's face it, I don't usually stick to my 2 tablespoons. I drown these suckers! It's all about how much spice YOU want.
     Ta Da!!! You're done! These things are so tasty and are a big hit for me and the mister. I think it might be the only way he's eaten cauliflower!
     Let's be honest, are these a complete trade for wings? Heck no. BUT, when you're looking for that spicy hot fix- they're great. Give it a try and let me know how you like 'em!

     To all you fellow teachers out there, get it started with a bang! I'm looking forward to meeting my new group of kiddos, and showing you my fabulous classroom. Much love to you all.

               <3 

Friday, August 16, 2013

Chips: You Can Eat Every Single One

     Nope. No typo. You can make all of these chips and then eat every single one. 

   As I've been thinking about this post, one thing has been in my mind. This post may be dancing on that line between "Yes, I'm healthy," and "I'm HEALTHY." I could be wrong, but sometimes I think KALE is on that dividing line. You may love this post, or look at it and think, "I'm out." That's really ok with me. 
     I WILL say this. I was what you might call "behind" that line originally. Until I tried these. Now I'm a huge fan. I challenge you to try them at least once. Then make your decision. Honestly, I was never really a huge fan of kale. It's a tough and very strong tasting green. As a child, I only saw it when I fed it to a pet rabbit. (rabbit obsession alert) Lately, I have been experiencing it in a variety of dishes and actually liking it. 
     The great thing about Kale Chips is the transformation they undertake in the oven. No lie. Sometimes it baffles me how something so tough and chewy can become fragile and crumbling. Nevertheless, here we go. The recipe is simple, but will take some monitoring if you buy a large amount of kale. 

Ingredients: 
*Kale (try your local Produce Junction!)
*Pam Olive Oil Spray
*Seasonings

*You will also need cookie sheets, parchment paper, and to preheat your oven to 350. 

     You are going to begin by rinsing all of your kale and placing it on a paper towel or dish towel to dry. It is important that you give it time to really dry- or press it between towels to get the excess water off. 

   The next step is to trim the kale. Believe it or not, the easiest way to do this is with your kitchen scissors. What you want to do is cut the leafiness away from the thickest part of the stem. No one really eats or likes to taste this very fibrous part of the leaf. You can basically just cut the whole leaf in half making one cut down each side of the stem. 
     From here, you can cut (or rip) the leaves into smaller bite size pieces. Let's be honest, I rip the kale. This is not an exact science. Just rip the dang leaves. While the pieces are sitting on a towel, you'll want to cover a cookie sheet with parchment paper. 
     Arrange your kale pieces on the parchment paper with a bit of space between each one. If the pieces are overlapped you may run across some pieces not being completely baked. 
     Next, spray each piece lightly with your spray Olive oil. This brand works really well for me. Now, I've seen different theories on this next part. Some recipes will tell you to season the chips after they are baked. I like to put my seasonings on before. I am of this opinion: why not bake your seasonings into the chip for more enhanced flavor? 
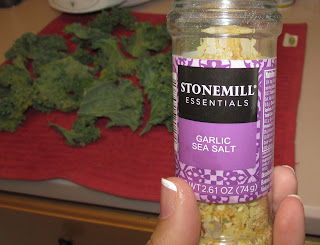
    So far, each time, I have used my "go-to" spice. A great garlic sea salt grinder I found at a discount store. In the future, I may branch out and go more bold with spices. (e.g. why not go with chili powder?!) 
     After seasoning your kale pieces, put them in the oven (at 350) for 10 minutes. If, at the ten minute mark, you notice they are not all looking crispy- keep going. With this important warning: Add on time in ONE TO TWO MINUTE INCREMENTS. It is very easy to burn these chips. Not that I'm speaking from experience or anything...Ok. Fine. I am. So there. And burnt kale chips- not tasty. 
    You'll see in this picture that the chips still have a good green coloring to them. If yours are brown...uh oh. Notice how much smaller they are! These leaves will now be delicate and crunchy. It will probably take you several rounds of this to finish all of your kale. (Depending on how much you buy!) 
     They definitely took on the salty, garlicy taste. Again, I'll say it, it's amazing how these just disintegrate in your mouth! When I'm craving something like crunchy, salty chips these are great. I can eat a ton and not feel bad later. 
     Give them a try and let me know how they turn out! OR pass on the healthy, healthy kale and come back here tomorrow. Why you ask? Because tomorrow I'm posting a CRAFT! Finally! I've been trying to get some more crafts for you to try out and it's finally here! See you here tomorrow! 

                  <3