Pages

Monday, December 9, 2013

Happy Thanksgiving!!! er....

Hello bloggers!
      You may think I'm crazy to still be wishing you a Happy Thanksgiving...but let's face it people, it WASN'T that long ago! Yikes! However, as promised...I bring you an unhealthy post! Let me tell you, it's worth it. If I were capable of showing you tons of "after" pictures I would. Alas, it disappeared quickly, so you are stuck with this one...

   WHAT!?!??!! That's right, Cinnamon Roll Apple Pie! A little bit ago, I saw a single picture on Pinterest and the gears started turning. This will not necessarily be a precise recipe, however I sometimes like to feel out the recipes as we go. (Apologies if that strikes fear into your heart...)

   Start out by picking your favorite pie crust recipe. Let's face it folks, dump some flour, sugar, a bit of salt, and a ton of butter into a food processor. If you're thinking I mistyped the words food processor...I did not. It works like a charm! A few teaspoons of water later, you've got pie crust. Divide your crust into two halves and refrigerate them for a bit in order to work more easily with it later.


Pull your dough out of the fridge, flour a surface, and start rolling out a rectangle.

   Once you have a lovely rectangle, moisten it a bit with wet hands, and smear on some cinnamon. I did not add sugar for a few reasons. The first has to do with the amount of sugar in the pie filling. The second has do to with the ooey- gooey factor. I did not want to have pie crust falling apart from melted sugar. The next step is just to roll up your cinnamon-y dough!


   It's pretty simple from here on out! Slice your rolled up dough and slice by slice press it to the pie plate. It is important to try and minimize spaces between each slice.

   It is your choice from here on out if you pre-bake your crust or just add in the filling. Usually pie crust is only pre-baked if you do not need to bake the filling. So I "peeled-cored-sliced" about 3 Honeycrisp apples. (I have a small love affair with these apples...I buy dozens of them when they are in season!)
   Those got tossed in about 3/4 of a cup of sugar and a few tablespoons of cinnamon. When they are coated, dump 'em on in your crust.

   NOW, I repeat the same rolling, cinnamon, roll-up process with your second ball of pie dough. I originally thought I could use a rolling pin to roll together a sheet of the cinnamon roll slices and then place it on top of the pie. (SEE: Learn from my mistake) It did NOT work. haha. However, I quickly decided to just individually place the flattened slices on top of the pie and merge them as best as possible. It was not actually that difficult. 
   This got brushed with an egg wash and popped in the oven. (Egg wash: scrambled one whole egg and brushed it on) It stayed in the oven at about 350 for about 45 minutes. It smelled DELICIOUS, and came out beautifully! 
   I had to show you that shot one more time cause it's so dang pretty! I also took some fun shots so you could see that the beauty was visible from all angles! 

Thanks to Momma for holding the pie while I laid on the floor! 
   Let me tell you friends, it was a huge hit and it disappeared! It was just so fun and tasty. Who wouldn't want cinnamon rolls AND apple pie?!?! I dare you to give it a try. It's worth the attempt. (Or bribe a friend to do it!) 
    I hope you all had a wonderful and relaxing Thanksgiving. As I type to you, I am enjoying a wintery snowy night and the view of my art project that will be up here next!

           <3

Tuesday, November 19, 2013

From the Farm: Frying Peppers etc...

     Well dear friends, let me start out with an apology for the prolonged dead air. Life has been hectic- which I'm sure is the same for you. And while there may not have been much typing on my end, there WAS cooking! Regardless, I am happy to be seated in a warm home with a full belly and writing to you.
      I am happy to bring you two different options for frying peppers (don't forget mine are KY bred!). One of the options was done with bell peppers due to a mismanagement of peppers. :P Oops! However- you can do BOTH with frying peppers.
      The first option is your quick and easy, go-to recipe. Imagine this: fry..... your frying peppers. WHOA! Watch out! I know- you didn't expect it. However, it is delicious, and it's what they're great for. It takes very little time and management. Here we go!

You will need:

*About 15 small frying peppers (mine are Hungarian frying peppers from KY--> well traveled)
*1/3 of a cup of diced onion
*1-2 tablespoons olive oil
*1 teaspoon chili powder
*1 teaspoon garlic powder

Here are your marching orders:

1. Start your oil, seasonings, and onions heating on low heat in a pan.
2. Clean, seed and cut your peppers in half.
3. When the onions are beginning to be translucent, drop in your frying peppers.
4. Toss the peppers and onions a bit, and let them cook at medium heat.
5. Timing is kind of a personal touch with this. I'll explain, I like my frying peppers to have a bit of a crunch to them. If you are more into a softer cooked pepper you'll want to go longer. For my peppers, I cooked them for about 10-15 minutes. You can see in the pictures that follow, they still
have the majority of their color due to the quicker toss on the stove.


*The great thing about this is that you can individualize the spices. I was looking for a bit of kick with the peppers- hence the chili powder. You can also go basic with onion and garlic. Or go Hungarian (sorry- it's the majority of my blood- can't get away) and add in some paprika with it!


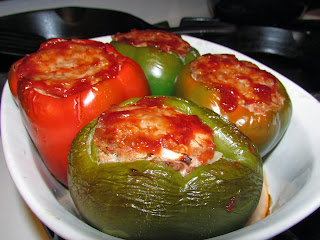
   ARE YOU READY FOR RECIPE #2 ????? This second option is a bit more involved- but WAY worth it! A bit ago, the Hubby had been throwing out the words "stuffed peppers" every so often. It was a good hint to throw out.
   Now, I will preface this recipe. (cough cough, to my family members reading this) My main heritage and culinary experience centers around Hungarian food. I was blessed to have the opportunity to learn to cook with my grandmother. For a summer, we spent afternoons cooking all of the Hungarian regulars that I grew up with.  HOWEVER, this recipe is NOT the stuffed peppers I grew up with (nor my other family members - yes you guys). The recipe I grew up with and have made previously involves more of a sauce using tomato paste etc. Due to a lack of certain items in the pantry, I improvised. In the future- if you all are curious- I can post the true Hungarian version!

You Will Need:
*4 Bell peppers -you can use frying peppers if you'd like- you will need more than 4 as they are smaller
*1 lb. 93% lean ground turkey  (this can be substituted with ground beef if you'd like)
*1/3 cup chopped onion
*1/4 cup ketchup
*2 teaspoons garlic powder
*1/3 cup oats (your binding agent)
*1 tablespoon (or so) olive oil

Marching Orders Are:
1. Preheat your oven to 375 degrees.
2. Wash and seed your peppers and cut off just the top - so they look like little bowls.
3. Combine your ground turkey, onion, ketchup, garlic powder, oats, and olive oil in a bowl.
4. Put your peppers in a baking dish that will be able to hold them all standing up right.
5. Fill the peppers with the well mixed meat and seasonings. You can fill them pretty tight as it will reduce a bit.
6. I added a bit of extra ketchup to the top of each pepper for extra flavor and moisture. About half way through the baking, my two peppers got some shredded mozzarella on top as well.
7. Bake your peppers for about 30-45 minutes. I say this because I originally was going for 30 minutes in the oven, but upon opening up one of them, I found that they needed a bit more time.
\


Mid cook before cheese!

*Enjoy! I personally like to keep the ketchup on the table in case of a need for more. Overall- these were a huge hit with the Hubby and one was filling enough for each of us! I'm sure that now that this post is up, I will be reminded of HOW LONG ago it was that I made them. :)


   It is wonderful to be back on and typing to you. Whoever you are. Pleeeaase look forward to THANKSGIVING- A delicious pie is on deck with a fun new crust idea! And more importantly- be thankful. I know I am. I am thankful for the roof over my head, the husband who loves me, and the family and friends that support me. I am a blessed woman. Thank you to YOU for reading this and supporting me too! Again- I am just so blessed!

            <3

Sunday, October 6, 2013

From the Farm Part 2: Jalapeños

Well, it's time for Part 2 of "From the Farm!" 

     Along with about 2 dozen apples and a dozen pears, we also became home to a little over a dozen jalapeños. While some of you wonderful readers may LOVE eating jalapeños all of the time, I couldn't quite imagine enough foods to eat jalapeños in before they went bad. 
     After a bit of research and formulation of ideas, I came up with a plan to at least preserve the jalapeños until it was time to make Fall/Winter chili. I will tell you about that first, but keep reading until the end, because there is also a quick and easy dip recipe at the end! 

You Will Need: (for preserving) 
* about 12 jalapeños
*1-2 teaspoons olive oil
*salt and pepper to taste

NOW- HERE IS YOUR WARNING!!!! When you work with jalapeños, I would highly advise wearing latex gloves (or any gloves for that matter). The minute you touch a lot of jalapeños with bare hands, your hands may react, but even worse will be when you accidentally touch your eyes or lick your fingers. WEAR GLOVES. 

     OK, now that that's over with, here we go. Begin by seeding your all of your jalapeños except for 1. Keep that one to the side until later. 

     Place the seeded and de-stemmed jalapeños in a pot of boiling water for about 10-15 minutes. It's crazy how even the steam from the boiling water caused some coughing effects! 
     The red peppers are jalapeños as well. That's what a mature and fully ripened jalapeño looks like! Now, from here I took all of the jalapeños and put them in my food processor. To that you'll want to add the olive oil, a tablespoon of the water the peppers were boiled in, and your salt and pepper for seasoning. 
     From here, I pulsed the food processor until I had a pretty decent puree. I didn't go too far, because the little flecks of red interspersed with the green looked lovely. 
     The puree was then transferred for my genius idea!! Wait for it..... ICE CUBE TRAY. Over the summer I read several magazines that had fun ideas of things to freeze in ice cube trays. Now, this comes with another warning. My suggestion would be to designate this tray for fun freezing adventures post jalapeños. Unless spicy water is something you're into... I am personally not EVER making regular ice cubs with this one again. 
    Voila! I have portioned amounts of jalapeño puree that can be pulled from the freezer and dropped into a crock pot of chili during the cold months! 

    Now comes the recipe you read to the end for! I cannot take credit for this recipe, but I can send a BIG thank you to my wonderful friend Becky for letting me watch while she made it! 

Ingredients: 
*2 blocks feta cheese
*3 seeded jalapeños (leave the seeds if you really like heat) 
*1-2 tablespoons olive oil

     The beauty in this dip is how easy it is. Plus who doesn't like spicy AND cheesy?!?! Dump all of the ingredients into a food processor and let it go until you have a creamy, pureed, slightly neon green dip. I swear I want to hug Becky an extra 3 times when she walks through the door with this dip. It works great with pita, or tortilla chips, or just your fingers. 
     Well, that's it for today's "From the Farm" edition. It's a wonderful Sunday night, there are Turkey burgers grilling, and I'm gearing up for another week with my classroom of goofballs. I hope you all had a wonderful weekend, as I did, and relaxed! As always, if you attempt one of my adventures please let me know how it goes! Or feel free to ask questions! 

               <3 


Saturday, October 5, 2013

From the Farm Part 1: Apples and Pears!

     This is the beginning of what I've decided to call my "From the Farm" series. You see friends, the Kentucky Farm Fairy came to visit a week or two ago. You may ask, who or what is the Kentucky Farm Fairy?? Well, he looks an awful lot like my father in law.
     My father in law has a great farm in Kentucky, complete with two hilarious dogs, and a barn with a pottery room! (side note: the pottery room makes me wish Kentucky was a whole lot closer...) Recently, when he came to visit, there was an abundance of produce in tow. 
     My kitchen table was covered in such a variety of produce and it sent my creative juices in a tizzy! You'll see a lovely bowl in the picture that was handmade and now belongs to us! We're going to start off the series with the two dozen apples and dozen pears you see above. There was no way to eat them fast enough, so I ran through all of my options in my head. A lovely idea popped up and I ran with it. 
     Applesauce. I'd never tried it before, and I had this funny idea. I'm not crazy about really sweet applesauce, or adding lots of sugar into many things. After tasting a pear (and briefly going to heaven) I had the clever idea of using pears in my applesauce as a sweetener. So, let's great straight to work.

You Will Need:
*18-20 peeled, cored, and sliced apples
*4-5 pears
*1 1/2 teaspoons cinnamon
*1/2 teaspoon ginger
*1/2 cup water

(As an additional note, if I'd had Pumpkin Spices, I absolutely would have used those!!! However, for some reason it's difficult to find a shelf that HAS pumpkin spices in September...)

     Begin by getting your apples ready. I would highly suggest you invest in one of these phenomenal gadgets. Or, invest in a friend who happens to have one as well....thanks Sarah! 
     It's the quickest, easiest way to get your apples ready. It's super exciting to use, (Perhaps you're reading into this and realizing I'm easily amused...) and the apples come out looking like silly curls! 
     Back to the recipe...Once you have gotten all of the apples ready, dump them in the crock pot. Yup. That's right. My crock pot is at it again. Seriously, it rarely gets put away! 
     You'll see that I cut my pears up into the crock pot as well. From here it's a few simple steps and you're done. Add in your 1/2 cup of water and spices. 
     Now, turn your crock pot on high and walk away from it for about 3-4 hours. When you come back the apples will be SO SOFT. All it took was a few minutes with a potato masher. I happened to want my apple sauce a little smoother, so I whisked it a bit as well. 
     From here, all you have to do is put it in jars. Do it quickly- because if you don't, it will get eaten up before you can even put it away. Also, if you weren't sure, you can freeze some of your applesauce as well. That way you have the exciting choice of eating more after you think it's all gone! Seriously, I must have eaten a whole cup of it warm, it was so delicious!! 
     I think from here on out, I will only be eating home made applesauce. It was the best applesauce I've EVER tasted. In all seriousness though, if I'd known it was this easy to make applesauce in a crock pot I'd have been making it all the time. 
     AND, if for some reason you have an apple or two left over....try this! Take those same spirally apples, stick 'em in a pan, sprinkle some cinnamon on, and bake for about 20 minutes at 350. De-lish


Momma insisted you see this view as well. So there are her fingers!

     Well folks, this is the end of Part 1 of "From the Farm." You can look forward to: Hungarian Frying Peppers, Jalapeños, and Beets! Stay happy and enjoy the fall, friends! 

                 <3 

Saturday, September 14, 2013

Promoting Responsibility with my own Immaturity!

     Well, the last few weeks of quiet can only mean one thing. School is back and in full swing! Now, I've been promising pictures of my classroom, and I have some! However, I'll be showing you my classroom a few little pieces at a time. Not because it's a work in progress or anything...

      My first glimpse into the classroom is a small but powerful area. In our district, Fifth grade and Sixth grade are in one building together. I happen to love this idea and think it works fantastically (not biased or anything). However, that means that the move from 4th to 5th is a BIG one. Students go from being in a very Elementary school setting to one that is a step closer to Middle school. They have lockers and they switch for classes. This transition requires a lot of work, but it is also crucial. Students, for the first time, have to truly be independent and responsible for their education. That happens to be something I love to instill in my students. Their education can't be taken away from them and it is something to cherish and work hard on.

     For this reason, I try to create a classroom that fosters that independence. Each area is a tool that they can use to become responsible. The first area I am showing you is at the very front of my room. (On each side of the door!) It is where work is received and turned in. First, let me introduce you to the Absent Bin. In the past, if students missed school they would frequently just be handed what they missed. Now, don't get me wrong, I'm not just making my students fend for themselves! However, I believe that a great step for students to take is to come back from an absence and take the initiative. Instead of waiting for someone to come to them, they can take the first step. It shows that they understand that what they missed is important.
     Now, just because it fosters independence doesn't mean it can't look hilariously entertaining! My entire room this year has a Despicable Me Minion theme. I can't get enough of those little dudes. They crack me up! What you are looking at is a box that can hold hanging folders. 

     Inside, are 4 folders with a few extras behind. Each folder is designated for a specific subject. The last folder is called "Friday Folder." This is because, each Friday students have a special folder to take home graded work and flyers to their parents. This folder then gets signed and returned so that I know their parents saw all of the most important papers. If a student loses one of those papers, they can get extras in that folder. The subject folders get filled with extras of each paper I hand out in that class period for the week. 
     The beauty in this is that students don't even have to ask for papers they missed. They are able to walk up to this box and find the information they will need for each class missed. Obviously I am always around if they need to ask questions! 

     On the other side of the door way is where work gets turned in. At the beginning of the year, students get several reminders to turn in their work each period. As we go through the year they get fewer reminders. This enables them to begin to make it a habit to enter the room and turn in work immediately. Of course- they are entertaining as well! 
 
     Seriously can't get enough of the Minions. ANYWAY, here are two very important parts of my classroom. You also get the sneak peek of all of the Minion signs/decorations that I've made for the room. Enjoy, give me your feedback, steal the idea for yourself or do all of the above. I'm just glad I finally had a few moments to show you what I'm proud of in my room! 


                 <3

Monday, September 2, 2013

For When You'd Rather Eat Wings

Hey Friends,
        We're at T minus 15 hours to the first day of school! I am working on making sure that everything is ready (or as close as it's gonna be!).

         This recipe has been ready to shoot out to you for a bit now, and I'm excited to share it with you. Every so often I get the craving for wings and that kick of hot sauce. Of course, I very rarely have wings in the house, and they're not always the healthiest option for my hot sauce desires. Lucky for me, I found this method of dressing up veggies with the taste of wings!

You Will Need:
*one head of cauliflower
*2 tsp. olive oil
*1 tsp. garlic powder
*1 tsp. paprika
*1 tsp. chili powder
*1/2 tsp. kosher salt
*2 tbsp. hot sauce (or as much as you want!!)

     Let's get kickin'! Preheat your oven to 425, and get to washing that cauliflower. Once it is washed, break it up into little florets in a medium sized bowl. In a separate, smaller, bowl combine all of your spices. Apologies ahead of time; my mind went to La La Land and didn't get pictures of these first two steps.
   
     Believe it or not, you don't have many steps left. Drizzle your olive oil over the cauliflower florets and toss them a bit to make sure they are coated evenly. Next you're going to coat these florets with your spice mixture. It should look like this:
Voila!
          Pull out a cookie sheet that will be able to hold all of your kickin' florets! I like to cover my cookie sheets in tin foil so that the clean up is THAT MUCH EASIER! :) Spread your florets out on the sheet so that they are all in one even layer. 
    Pop these babies in the oven for about 25-30 minutes. They'll start to have some crispy, burnt edges to them when they're ready. When they come out of the oven, I like to dump them back into that original large bowl. That way, when you coat them with hot sauce, you pick up some of the extra spices that were left behind. You can't stop me from making sure there's LOTS of flavor.

    Pour in your hot sauce and mix to coat. Let's face it, I don't usually stick to my 2 tablespoons. I drown these suckers! It's all about how much spice YOU want.
     Ta Da!!! You're done! These things are so tasty and are a big hit for me and the mister. I think it might be the only way he's eaten cauliflower!
     Let's be honest, are these a complete trade for wings? Heck no. BUT, when you're looking for that spicy hot fix- they're great. Give it a try and let me know how you like 'em!

     To all you fellow teachers out there, get it started with a bang! I'm looking forward to meeting my new group of kiddos, and showing you my fabulous classroom. Much love to you all.

               <3 

Tuesday, August 20, 2013

The Most Dangerous Cake

     The Most Dangerous Cake.

     Prepare yourselves, because I'm about to expose my literary nerd status.  If you have never read the short story "The Most Dangerous Game," it's worth a read. The genius of this story is the situational irony that occurs at the resolution. The hunter becoming the hunted takes a surprising twist when you read the final scene.
     What does this have to do with cake? Great question. Believe me, when you take your first bite of this cake, you'll realize the tides have turned. You no longer have control. The cake is hunting YOU.


      A bit dramatic? Yes. Is this cake divine and irresistible? Yes again. Here we go!

You Will Need:
*One Box Devil's Food Cake
*1/2 of a 14 oz. can of sweetened condensed milk
*1/2 of a 12 oz. jar of Caramel ice cream topping
*One container whipped topping
*One bag Heath bar crunch topping (I found this in the baking aisle of my local grocery store)

     This, as always, is a Pinterest find that I've made my own few tweaks on. Begin by baking your Devil's Food cake according to the directions on the box. I made one alteration to the "typical" cake directions. When my cake batter was mixed, I added in about 5/6 tablespoons of Hershey's Dark Chocolate Syrup. I love giving a cake that extra oomph of chocolate, moistness, and depth.
     When your cake is out of the oven, set it aside to cool for only 5 minutes.
     You will then use those five minutes to prepare your Caramel drizzle. In a small saucepan on the stove, combine half of your can of condensed milk with half of a jar of caramel syrup.
     On low heat, stir frequently until the two are combined and slightly warmed. They will be a beautiful light caramel color that is warm and smooth.
    When this has been completed, move back to your cake and cut slits into the entire top of the cake. Be careful to not cut all the way through to the bottom.


Your next step is to pour your caramel sauce over the cake and let it soak in. (YUM!) 
        Follow this by sprinkling about 2/3 of your bag of Heath crumbles onto the cake and caramel sauce. You are then going to put the cake to the side and let it cool entirely. 
      The great thing about doing all of these steps while the cake is still warm, is the result! You get a great moist cake, with a slightly gooey, crunchy middle layer of caramel, chocolate and toffee. When your cake has cooled completely, "ice" it with your container of whipped topping. You'll want the whipped topping to be at least refrigerator temperature or room temperature. This will make it easier to spread. 
   Finally, sprinkle the remaining Heath Bar crumbles on top of your whipped topping layer. Cover and put in the refrigerator until you are ready to serve it! I brought this to a family barbecue last weekend, and believe me when I say- it was a hit. In fact, I was nervous to bring the left overs home with me for fear that I would gobble it all up way too quickly! 
   This was a fantastic Pinterest find, that worked very well for me. Again, though, be warned. It is DANGEROUS! You will not want to leave any left in the pan! 
    Well, ladies and gents, I am writing to you in my last few days of freedom before I head back to the school building. There is one more recipe locked and loaded to be sent out to you soon, and then you'll get classroom shots! Keep cool in these next hot days of summer. 
             
                     <3