Pages

Showing posts with label crafts. Show all posts

Friday, July 24, 2015

Cookies, and Quinoa and Crafts, Oh My!

   Whatever you do, don't look at the date of my last post. Seriously. Ok, now we can move on. Because the most important thing here, is the food. You guys are getting a two-for-one here today. Mostly because I've been getting requests for two specific recipes. One is a newer quinoa salad I tried recently for a grilling and games night. The other is a cookie recipe I've been working on over the course of a year or so tweaking a bit every time I go. At the end I have a few recent craft pics to wrap it all up with.
      The first recipe is a quinoa veggie salad with a bit of a Mexican flavor flair. It was a Pinterest find that was altered. I know, you're shocked. I was afraid it wouldn't be a hit when I started out because it just seemed so healthy....haha. Thank goodness they thought it was delicious before they realized it was good for them. :) Unfortunately, I have no pictures for you of this one. *See below for added pic from a later batch* Luckily for you, all it's a dump everything in a bowl recipe!

     Quinoa Veggie Salad 

Ingredients:

1 1/2 cups of cooked quinoa (I always cook it in chicken broth- way better taste!)
1 diced cucumber
1 chopped red pepper
3 chopped scallions
Corn chopped off of two corn cobs (or a can of corn- I just love the fresh summer corn!)
1/2 can of black beans

Dressing:
1/4 cup olive oil
Juice from one whole lime
1 tsp. salt
1 tsp. cumin
1 tsp. cayenne

    After you toss all of the veggies into the quinoa, make the dressing on the side. All of the dressing ingredients get mixed together and tossed into the salad. This was a great side for grilling in the summer. It has great fresh flavor and a lot of perfect summer veggies that are in season.

    Now it comes to the most important recipe. I'm serious. It's going to rock your world. Nobody believes me when I tell them that something this delicious doesn't have flour or butter in it either! They are phenomenal. When my colleagues at school know I've been baking, I get classroom pop-ins all day long. It's my favorite treat for my friends that are trying to avoid gluten as well. I love the smiles on their faces when I tell them they can really eat the cookies. YAY! On to the fabulousness of double chocolate cookies... This recipe makes about three dozen smaller sized cookies.

Ingredients:
3 room temperature egg whites (temperature matters!!!!)
1 1/2 cups of confectioners sugar
1 1/2 cups of Ghiradelli 60% Bittersweet chocolate
1/2 cup unsweetened cocoa powder
1 tablespoon cornstarch
1/4 teaspoon salt
Non-stick baking spray if you don't have fun silicone baking mats (best purchase ever!!!)

     Start out by preheating your oven to 350 degrees. Put one cup of the chocolate chips in a bowl and melt them in a microwave. It's best to do this in 20-30 second intervals so that your chocolate doesn't seize up. This can go to the side for right now. In a medium sized mixing bowl, sift together one cup of the confectioners sugar, the cocoa, cornstarch and salt. This can stay to the side for right now as well.
     The rest of the main work can be done with a hand mixer or in a stand mixer. I go straight to my bright purple kitchen aid stand mixer. She's the best. (no judging!) Beat the three egg whites until they form soft peaks. (aka making a meringue base) Once the egg whites can hold their shape a bit, put the mixer on a slower speed and mix in 1/2 a cup of confectioner's sugar. When it looks like marshmallow fluff it's done! Next you're going to mix in the other sifted dry ingredients. Do this a little bit at a time so that you don't have a big powdery mess in your kitchen. (Not from experience...at all...) Once that's been mixed in you can put your hand mixer away, or just take the bowl out of the stand mixer. Add the remaining half cup of chocolate chips to the melted chocolate and then fold this whole mixture into your meringue base. From here it should start to stiffen and become a more solid cookie base. I use a silicone baking mat and cookie scooper to form and bake my cookies. If you don't have the mat, use your baking spray on cookie sheets. Using a scooper or spoon, form the batter into balls and place on the cookie sheet. Now the original recipe included rolling the cookies in more powdered sugar to give them a crinkled look. You can absolutely do this. I've found I like them more without. (My great uncle LOVED these cookies and prompted the exclusion of the powdered sugar) Alright- back on track- bake your cookies for ten minutes and let them cool for at least ten minutes. You're good to go. Try not to eat them all at once. I swear.
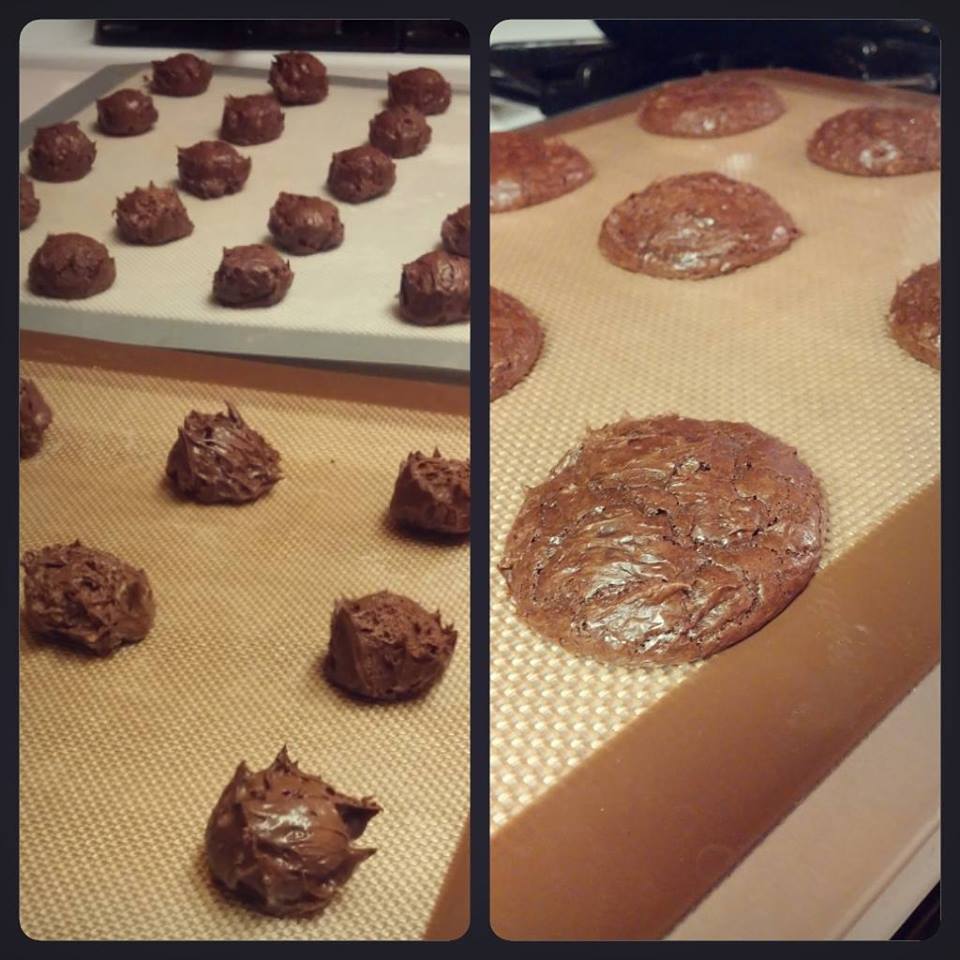
Most recent batch!
These are what they look like with the crinkle cookie look
     Finally, here is a sneak peek of the craft I did recently. I wanted to upgrade my olive and vinegar set because, let's be honest, it was just the bottles they came in. So I found plain glass bottles at my local Bed Bath and Beyond for about $4 each and went straight to my sketch book! 

     Once I had a design that I liked, I grabbed my paint and brush. I went with a black and white look so that each design would stand out against the contents of the bottle. Black is the olive oil and white is for the balsamic. The great thing about painting acrylic on glass is that if you make a mistake you can either wipe or scratch it right off. (This can also be a downside too...oops) The completed bottles got a clear coat that can technically go through a dishwasher. I don't know that I'm brave enough to really try that, might go straight for the hand washing route. 


     Ta-da! Here's the final look! I really ended up loving them and they went straight into the kitchen. I may or may not be able to be bribed for your very own set. 
     
     Alright folks, that's about it for tonight! Try the recipes and give me a shout if you have any trouble or improvements! 

Saturday, March 15, 2014

Fat Kid Food- BUT Healthy!

Hi friends,
     In the time that I last wrote, the heater has been broken and fixed, my brother got married, the washer broke and is being replaced, and Spring weather finally made an appearance! I am so excited to share so many things with you, but we'll start with FOOD. (and end with crafts!!)
      As always, I am on the lookout for ways to make food that tastes like eating buffalo wings but will let me feel healthy afterwards. This is not a wing substitute- don't get me wrong! BUT it does have chicken and buffalo sauce. I introduce to you: Buffalo Quinoa Casserole.

You Will Need:

*1 cup of quinoa
*1 1/2 cups of chicken broth (I use bullion cubes sometimes)
*1 head of broccoli cut into florets
*1 cup of hot sauce (I buy it by the gallon now…haha)
*2 chicken breasts
*chili powder for seasoning
*1/2 a small onion chopped up
*olive oil for sautéing onions and cooking chicken
*your favorite shredded cheese if you want to top the casserole off with it!

Begin by sautéing the chopped onion in olive oil in a pan. While this is cooking, season the chicken breast with chili powder.
Add in the chicken breasts and cook completely. I sometimes put a lid on the pan to keep in moisture. When the chicken has cooked, pull it from the pan. I then shredded it and put the onions in with the shredded chicken. 
Put this to the side, and begin cooking your quinoa. I cook my quinoa in chicken broth ALL.THE.TIME now. Seriously- there is no point to cooking it in water…unless you don't like chicken. The ratio is about 1 cup of quinoa to 1 1/2 or 2 cups of water/broth. Bring the water to a boil with the quinoa in it and then put a lid on it and let it simmer for 10-15 minutes. Now, when I put it to simmer, I tossed in my broccoli florets to cook in some of the flavor with that as well. What results is perfectly cooked broccoli that is already in the quinoa! 
Finally I get a large oven-safe dish and poor my hot sauce in. The first time I tried heating it and adding a bit of cottage cheese to get a creamy/healthy effect. It worked- but you can definitely do it without as well. 
check out the fun nails! 
Toss in the chicken, and broccoli quinoa mixture gently. I added a bit of hot sauce on the top once it was mixed as well. (I know, I know…can't get enough of it) Then I baked it in the oven for an additional 10-15 minutes at 350. You could add the cheese for this step as well. (I waited and put it on my individual serving)
It's not the prettiest dish I've ever made, but it's DELICIOUS. I've been all about quinoa "casseroles" lately. They're great! You can do anything with it! (Will show you chicken with zucchini as well sometime!) 

Here is a final shot of my serving with the melted cheese on top. Seriously, it was just so yummy and filling. You don't even have to eat a whole ton of it to be satisfied. Just so tasty and popular with the hubby!

I will leave you with a few shots of my latest crafts! Most of the earrings are either available or can be reproduced if they've been sold already. The ring holders are able to be ordered to your personal liking. Choose the frame and the fabric color! Enjoy and cross your fingers for MORE SPRING! 


        <3 

Tuesday, June 25, 2013

You Choose Tuesday!

Alright ladies and gents,
       I am very pleased to say that it is officially my summer vacation! To start off the summer vacation I want to say a big thank you. In four posts, over two weeks, my blog has gotten roughly 300 views!! Not only have many of you been reading, but you've been reading from all over the world! I'm honored to see views from everywhere from Russia, to Brazil, to Croatia and back again. So, THANK YOU!

       Now, on to the next business, YOU CHOOSE! With my newly found freedom and time, I'd like to know what you want to see over the summer.

*Have you been looking for fun summer desserts?

*New things to throw on the grill?

*A healthy solution to a normally unhealthy snack?

*Fun DIY projects to do around the house?

*Crafts you'd like to be able to purchase?


     Leave a comment below and I'll work on some fun posts to share with you this summer! Some lucky people may even win freebies! Let me know what you are interested in and I'll enjoy some new directions over the summer. 


    I leave you with another pair of adorable ring frames that are going to happy homes as of yesterday! If you're interested in your very own customized ring holder feel free to contact me. I am loving making them! 


    Alright people! Comment away! 
                    
                                                                             <3


Sunday, June 23, 2013

Food, food, and more food!

     Alright people! I promised lots of food, and here it is! This weekend was a delicious few days of yumminess. It began last night with Broccoli Quinoa Bites. This is a recipe I've altered from one found on Pinterest.


You will need the following ingredients: 
      (yields ~15 bites)
                    2 heads broccoli (cut into florets) 
                    1 cup quinoa
                    2 cups chicken broth 
                           (I made mine with buillon cubes) 
                    2 eggs
                    1/4 cup Ranch Dressing
                    About 1 tsp. salt and pepper to taste
                    shredded cheese (optional) 

     Cook the quinoa in the chicken broth according to the directions on the box and set to the side to cool. While it is cooling, scramble the two eggs in a large bowl and add the Ranch dressing and salt and pepper. When that is mixed add in the cooled quinoa and broccoli florets. Now, in order to keep the hubby's cholesterol happy I split my batch from here on out. If that is not a concern of yours, keep on chugging and add in the shredded cheese. I use about 1/2 a cup of shredded cheddar for my half of the batch. You can adjust if you'll be adding to the entire batch. From here, all you do is spoon it into a greased muffin tin and bake for about 30 minutes at 350 until the tops are golden brown. They are the perfect balanced addition to a meal (or snack if you want to grab one and go!). I love the crispy edges and texture of the quinoa with the broccoli. It's fantastic. 


     Now, that brings us to the next part of the meal. The hubby recently tossed out the idea of Turkey Burgers and sent me into a Pinterest frenzy. After looking at several (ok A LOT) of recipes I came up with a rather simple one of my own. Based on a few people's sites I went with 93% lean ground turkey.   It is a decent mix of dark and light meat but still healthy for you. 
      Here are your ingredients: 
              2 lbs. ground turkey
              1 dry Ranch Mix packet
              2 tsp. onion powder
              1 minced garlic clove
              2 tbsp. olive oil 
      
      Mix all of your ingredients together in a bowl. I separated my meat into 8 larger patties, however in hind sight I may have made more patties that were smaller. From here I packaged them individually in wax paper and stuck them in the freezer. For the most part this was for the patties that we were NOT using today. However, it also allowed the ones we used today to keep their shape a bit better on the grill. 
      From here, the burgers went on the grill with some fresh corn. The burgers were topped off with a mozzarella/cheddar mix cheese. The corn was pretty simple. It takes a bit longer on the grill, but I cut off the ends ahead of time to make it easier for the husks to come off after they were done. Ok, and by that I mean, so it was easier for the hubby to take the husks off when it was done...The whole thing was finished off on a whole wheat bun with a Quinoa Bite on the side! Now, let me tell you, both the hubby and I are VERY happy to have more burgers in the freezer and Bites in the fridge. It was a DELICIOUS dinner! 

        I leave you with a picture of my newest favorite thing that's been selling fast! These are the most adorable little ring holders. I keep my own on the counter next to the sink for when I'm cooking and doing dishes. My favorite thing about them is that they make your ring look like a little work of art. Because, let's face it, that thing deserves to be hung in a frame in a gallery! Even better, if you are in the area and would like your very own personalized frame, I'm selling them for $10 each! Hop on the band wagon and get yourself one! 

Alright everyone, I think that's enough for one night!!! Have a wonderful Monday and I'll see you on here real soon. 

<3