Pages

Tuesday, August 20, 2013

The Most Dangerous Cake

     The Most Dangerous Cake.

     Prepare yourselves, because I'm about to expose my literary nerd status.  If you have never read the short story "The Most Dangerous Game," it's worth a read. The genius of this story is the situational irony that occurs at the resolution. The hunter becoming the hunted takes a surprising twist when you read the final scene.
     What does this have to do with cake? Great question. Believe me, when you take your first bite of this cake, you'll realize the tides have turned. You no longer have control. The cake is hunting YOU.


      A bit dramatic? Yes. Is this cake divine and irresistible? Yes again. Here we go!

You Will Need:
*One Box Devil's Food Cake
*1/2 of a 14 oz. can of sweetened condensed milk
*1/2 of a 12 oz. jar of Caramel ice cream topping
*One container whipped topping
*One bag Heath bar crunch topping (I found this in the baking aisle of my local grocery store)

     This, as always, is a Pinterest find that I've made my own few tweaks on. Begin by baking your Devil's Food cake according to the directions on the box. I made one alteration to the "typical" cake directions. When my cake batter was mixed, I added in about 5/6 tablespoons of Hershey's Dark Chocolate Syrup. I love giving a cake that extra oomph of chocolate, moistness, and depth.
     When your cake is out of the oven, set it aside to cool for only 5 minutes.
     You will then use those five minutes to prepare your Caramel drizzle. In a small saucepan on the stove, combine half of your can of condensed milk with half of a jar of caramel syrup.
     On low heat, stir frequently until the two are combined and slightly warmed. They will be a beautiful light caramel color that is warm and smooth.
    When this has been completed, move back to your cake and cut slits into the entire top of the cake. Be careful to not cut all the way through to the bottom.


Your next step is to pour your caramel sauce over the cake and let it soak in. (YUM!) 
        Follow this by sprinkling about 2/3 of your bag of Heath crumbles onto the cake and caramel sauce. You are then going to put the cake to the side and let it cool entirely. 
      The great thing about doing all of these steps while the cake is still warm, is the result! You get a great moist cake, with a slightly gooey, crunchy middle layer of caramel, chocolate and toffee. When your cake has cooled completely, "ice" it with your container of whipped topping. You'll want the whipped topping to be at least refrigerator temperature or room temperature. This will make it easier to spread. 
   Finally, sprinkle the remaining Heath Bar crumbles on top of your whipped topping layer. Cover and put in the refrigerator until you are ready to serve it! I brought this to a family barbecue last weekend, and believe me when I say- it was a hit. In fact, I was nervous to bring the left overs home with me for fear that I would gobble it all up way too quickly! 
   This was a fantastic Pinterest find, that worked very well for me. Again, though, be warned. It is DANGEROUS! You will not want to leave any left in the pan! 
    Well, ladies and gents, I am writing to you in my last few days of freedom before I head back to the school building. There is one more recipe locked and loaded to be sent out to you soon, and then you'll get classroom shots! Keep cool in these next hot days of summer. 
             
                     <3 

Saturday, August 17, 2013

Craft: Welcome to Our Home

     As promised, today brings a craft post! FINALLY.

     When someone goes to their happy place they may picture their feet in the sand, with the crashing of waves on the beach. Or perhaps you go to a forest with sunlight streaming through the leaves and the sounds of birds chirping around you.
     I go to Michael's. That's right. Don't judge. The smell of craft supplies and endless varieties of options makes me excited and relaxed all at once. For a few brief shining moments, Michael's had a Membership Rewards program. In the few months that it existed, I made it to Gold member status.

I SAID DON'T JUDGE. haha.

Let's face it. I LOVE crafts and would empty my bank account on crafts if I could.

     With that being said, I have been eager to create things for decor in our new house. I lucked out on a recent trip to Michael's and knew just what I wanted to do. As I browsed Michael's to refresh some calligraphy materials for a wedding order, I happened upon these simple dudes.
     For $0.99 I got myself two wooden frames that fit a 5x7 image. Our front door has had an empty hook for the last 4 months and this was going to fix that! While these are adorable, they are also slightly blah.
     My first step was to change their coloring. I knew I wanted to keep the integrity of the wood, and I also had no official stain. I had read various posts on using tea to stain things. So I got myself a mug of very concentrated tea.
     To apply the tea, I used one of those $1 foam wedge "brushes." WARNING. After about 4-5 coats of tea you could barely tell the difference and my patience was slowly slipping away from me. Understatement, my patience was gone. I thought through my options and refused the option of going to buy stain or paint. I could solve this. And solve it I did.
     What got me this beautiful walnut coloring you ask?!? Instant Espresso. No joke. It was one shelf below the tea and I knew it would be much stronger. :) So I forged ahead with my sponge brush and a cup of espresso. Ok, two cups of espresso. One to drink, one to craft with.
      In my many hours of Pinterest browsing, I came upon this cute little graphic. I originally was not sure what I wanted to do with it, but as soon as I found the frames, it was set.
     I printed this out on regular printer paper with my home printer. In order to cut it to the correct size, I laid the image underneath of the frame exactly how I wanted it. From here, I used a pencil to mark the lines of the little semi-circles that lined the OUTSIDE of the inner frame. (If that's confusing, refer back to the first picture...) I basically wanted to make sure I would have enough paper to glue it to the back of the frame. Cutting it down was as simple as pulling out my paper cutter and lining up the marks.
     The final step was to apply some Mod Podge to the back of the frame and line up my picture correctly. After this dried, I added an extra coat of Mod Podge to the paper that was touching the frame as an additional safety measure. The awesome thing about this craft is, it only cost me 99 CENTS! And I still have another frame to be crafty with. I was even very resourceful and used the twine that held the two frames together originally to hang this new art on the front door.
     Here is the final product! I am very pleased with how it turned out. Especially the color (and scent!) of the wood. My brain is already buzzing with ideas for the second frame- so keep your eyes peeled for another craft!
     Have a wonderful sunny Saturday and be well friends. I am enjoying these last few days of summer before school starts up. Then you will get some posts about my organized classroom! Can't wait to show you the theme for this year!
     
                 <3

Friday, August 16, 2013

Chips: You Can Eat Every Single One

     Nope. No typo. You can make all of these chips and then eat every single one. 

   As I've been thinking about this post, one thing has been in my mind. This post may be dancing on that line between "Yes, I'm healthy," and "I'm HEALTHY." I could be wrong, but sometimes I think KALE is on that dividing line. You may love this post, or look at it and think, "I'm out." That's really ok with me. 
     I WILL say this. I was what you might call "behind" that line originally. Until I tried these. Now I'm a huge fan. I challenge you to try them at least once. Then make your decision. Honestly, I was never really a huge fan of kale. It's a tough and very strong tasting green. As a child, I only saw it when I fed it to a pet rabbit. (rabbit obsession alert) Lately, I have been experiencing it in a variety of dishes and actually liking it. 
     The great thing about Kale Chips is the transformation they undertake in the oven. No lie. Sometimes it baffles me how something so tough and chewy can become fragile and crumbling. Nevertheless, here we go. The recipe is simple, but will take some monitoring if you buy a large amount of kale. 

Ingredients: 
*Kale (try your local Produce Junction!)
*Pam Olive Oil Spray
*Seasonings

*You will also need cookie sheets, parchment paper, and to preheat your oven to 350. 

     You are going to begin by rinsing all of your kale and placing it on a paper towel or dish towel to dry. It is important that you give it time to really dry- or press it between towels to get the excess water off. 

   The next step is to trim the kale. Believe it or not, the easiest way to do this is with your kitchen scissors. What you want to do is cut the leafiness away from the thickest part of the stem. No one really eats or likes to taste this very fibrous part of the leaf. You can basically just cut the whole leaf in half making one cut down each side of the stem. 
     From here, you can cut (or rip) the leaves into smaller bite size pieces. Let's be honest, I rip the kale. This is not an exact science. Just rip the dang leaves. While the pieces are sitting on a towel, you'll want to cover a cookie sheet with parchment paper. 
     Arrange your kale pieces on the parchment paper with a bit of space between each one. If the pieces are overlapped you may run across some pieces not being completely baked. 
     Next, spray each piece lightly with your spray Olive oil. This brand works really well for me. Now, I've seen different theories on this next part. Some recipes will tell you to season the chips after they are baked. I like to put my seasonings on before. I am of this opinion: why not bake your seasonings into the chip for more enhanced flavor? 
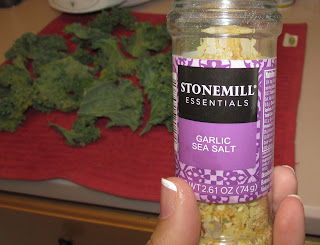
    So far, each time, I have used my "go-to" spice. A great garlic sea salt grinder I found at a discount store. In the future, I may branch out and go more bold with spices. (e.g. why not go with chili powder?!) 
     After seasoning your kale pieces, put them in the oven (at 350) for 10 minutes. If, at the ten minute mark, you notice they are not all looking crispy- keep going. With this important warning: Add on time in ONE TO TWO MINUTE INCREMENTS. It is very easy to burn these chips. Not that I'm speaking from experience or anything...Ok. Fine. I am. So there. And burnt kale chips- not tasty. 
    You'll see in this picture that the chips still have a good green coloring to them. If yours are brown...uh oh. Notice how much smaller they are! These leaves will now be delicate and crunchy. It will probably take you several rounds of this to finish all of your kale. (Depending on how much you buy!) 
     They definitely took on the salty, garlicy taste. Again, I'll say it, it's amazing how these just disintegrate in your mouth! When I'm craving something like crunchy, salty chips these are great. I can eat a ton and not feel bad later. 
     Give them a try and let me know how they turn out! OR pass on the healthy, healthy kale and come back here tomorrow. Why you ask? Because tomorrow I'm posting a CRAFT! Finally! I've been trying to get some more crafts for you to try out and it's finally here! See you here tomorrow! 

                  <3 

Tuesday, August 13, 2013

The Dying Tomato Fix: Sweet Balsamic Stewed Tomatoes

Hi All,
      I apologize for the temporary silence here on the blog! However- in the silence- we have reached 700 VIEWS!!! Holy Moly guys! Thank you so much. I love that some of you are sharing and using what I have here.

     Now, if I haven't mentioned it before, my mother and I have a standing date. We have a great little Produce Junction near us. So every Monday we go and buy mounds of produce. There are several fantastic things about this. 1: You have someone to split the huge quantities with. 2: MONEY SAVINGS. Quite honestly, reason number 2 should have sold you on its own.

     A bit ago, we split a bag of about 15 tomatoes. Here is where my mistake played into the equation. I put them in a beautiful bowl and promptly forgot about them for just a little too long. Well hello Problem, I have a Solution for you. In past meals, Hubby has finished off entire cans of stewed tomatoes. That got my lil head thinking. How hard can it really be? The answer- not too difficult! I've even got a fun trick for you to make it even easier.


What You'll Need:
*8 Tomatoes
*Half of a Red Onion diced
*2 cloves of Garlic minced
*1 tsp. Thyme
*1 tsp. Oregano
*1 tsp. Basil
*1 tsp. Garlic Powder
*1 tsp. Onion Powder
*2-3 tablespoons Balsamic Vinegar (you can skip this if you don't have it on hand)
*1-2 tablespoons Olive Oil

   If you can picture the stewed tomatoes you've had in the past, you'll (hopefully) remember that they do not have skin. I'm sure this can seem to be quite the dilemma. However- it really truly is not. Let me introduce you to a simple method thanks to my Momma (of course)!

   Place all of your tomatoes in a pot that has enough water to keep the tomatoes floating. Bring this pot to a boil. What you will notice as it boils, is that the skin of the tomatoes will split. As each tomato splits you can pull it out of the boiling water and drop it into a bowl of very cold water to the side. Continue this until all of your tomatoes have split their skin and are in the cold water bath.

      Here is the awesome part about this trick! When you pick up a tomato and start to pull the skin: the whole skin peels off easy-peasy-lemon-squeezy. Thank you to my Momma for the memory of watching that trick as a child.
     Once you have completed peeling each tomato, you are going to want to chop the tomatoes into slices and then quarter each slice. (Or however you'd like to.) Another note at this point, some other recipes will instruct you to take out the "core" of the tomato. If that is your preference, go for it. From my point of view after trying both ways, I couldn't tell the difference.

     At this point, you're going to want to get a pot on the stove with your Olive Oil, diced red onion, and minced (or pressed) garlic browning. The goal is to get your onions to a point of translucence.

    As you can see in this picture, I put my onions in first for a bit. Adding the garlic later kept it from burning. Once this is done, you can add in your chopped tomatoes and their juice. From here on out, this is ridiculously easy. Add in the rest of your spices. (Garlic powder, onion powder, thyme, oregano, basil)
      Lastly, add in the Balsamic Vinegar. I sometimes will also add about 1/2 a cup of water if the tomatoes were not very juicy.
     You're going to now put a lid on this pot and let it cook for about 15 minutes on medium-low heat. After the 15 minutes with the lid on, take it off. Cook the tomatoes for another 15 minutes with the lid off to cook off some of the liquid. (Not all of it!!) Voila! You're done!

      These were a huge hit here for dinner and disappeared quickly. My recipe is a bit of some research as well as some experimentation. So we're calling them Sweet Balsamic Stewed Tomatoes. I love the sweetness that the Red Onion and the Balsamic create. They would be great on chicken, or even tossed in pasta! However you're craving it at the minute.

     That's it for today. I'm currently typing and cooking my next blog post! So keep your eyes peeled. And a big THANK YOU again for 700 views! You all are awesome.

      <3